
We all love GitHub Actions, since it's easy to use, tightly integrated with GitHub and has many community driven actions that are quite handy. However, since GitHub Actions uses a usage-billing model instead of a flat rate or per-seat structure, CI costs could get unpredictable and out of hand quickly. In this article, we’ll explore practical ways to reduce GitHub Actions spending.
GitHub Actions operates on a usage-based billing model, where costs are incurred based on the execution time of jobs. Billing is calculated per minute, with each job rounded up to the nearest minute. This means that if a job runs for any portion of a minute, it will be billed as a full minute.
GitHub Actions compute is free for public repositories on their 2vCPU runners, ubuntu-latest. This allows open-source projects to utilize GitHub Actions at no cost. However, for private repositories, each account receives a certain number of free minutes and storage based on their subscription plan. For instance, GitHub Pro accounts typically receive 3,000 free minutes per month, while GitHub Team accounts get 50,000 minutes. Any usage beyond these allocations is subject to overage charges.
The prices above are for standard runners. For information about large runners, ARM runners, or GPU runners, you can check out GitHub's billing page. Runner costs scale linearly with the number of cores. For instance, a 4-core instance costs $0.016 per minute, which is twice the cost of a 2-core instance.
Since GitHub Actions bills each job rounded to the nearest minute, combining multiple jobs would reduce the total minutes billed. Instead of running multiple small jobs (e.g., individual jobs for testing different components of the codebase), consider grouping related jobs together into a larger job and having each component be a step.
For example, if you have jobs like unit tests, integration tests, and linting, instead of running each of these in separate jobs, you could merge them into one larger job.
Before optimization: separate jobs:
jobs:
  unit-tests:
    runs-on: ubuntu-latest
    steps:
      - name: Checkout code
        uses: actions/checkout@v2
      - name: Run Unit Tests
        run: npm test

  integration-tests:
    runs-on: ubuntu-latest
    steps:
      - name: Checkout code
        uses: actions/checkout@v2
      - name: Run Integration Tests
        run: npm run integration-test

  linting:
    runs-on: ubuntu-latest
    steps:
      - name: Checkout code
        uses: actions/checkout@v2
      - name: Lint Code
        run: npm run lint
Estimated Execution Time:
Total execution time: 8 minutes
After optimization: grouped job:
Here’s how you can combine those tasks into a single job:
jobs:
  test-and-lint:
    runs-on: ubuntu-latest
    steps:
      - name: Checkout code
        uses: actions/checkout@v2

      - name: Run Unit Tests
        run: npm test

      - name: Run Integration Tests
        run: npm run integration-test

      - name: Lint Code
        run: npm run lint
Estimated execution time:
Total execution time: = 2:10 + 2:30 + 1:10 = 5:50 (rounded to 6 minutes)
Cost summary:
Across dozens of pushes each day, these savings can add up over the course of a year.
Consider a scenario where developers frequently push updates to the same development branch. Each push may trigger a series of jobs, such as building the application, running tests, and deploying. Each job will run independently if multiple commits are pushed in quick succession without concurrency management. Since the CI results from earlier commits become irrelevant once new changes are pushed, older job results are unnecessary and lead to wasteful CI spend.
By using concurrency and setting cancel-in-progress to true, you can ensure that only the latest job runs while previous jobs are canceled, saving you compute costs. This is particularly beneficial for frequently triggered workflows, such as those activated on every push or pull request.
We have an entire blog on this topic that you should check out.
name: CI

on:
  push:
    branches:
      - main

concurrency:
  group: ${{ github.ref }}
  cancel-in-progress: true

jobs:
  build:
    runs-on: ubuntu-latest
    steps:
      - name: Checkout code
        uses: actions/checkout@v2

      - name: Build Application
        run: npm run build

      - name: Run Tests
run: npm testMatrix builds are handy to run jobs across multiple configurations, such as different OS environments or different versions of a language or framework. However, matrix builds can also contribute to high costs if not configured carefully since each combination in the matrix creates a new job that is billed separately.
Fail fast strategy
To minimize unnecessary costs when using matrix builds, use fail-fast. This would stop the execution of further jobs in the matrix as soon as one of the jobs fails. This is particularly valuable for workflows where you are testing across multiple versions of an application or operating systems.
For instance, imagine you have a matrix configuration that tests your application on three different versions of Node.js:
jobs:
  test:
    runs-on: ubuntu-latest
    strategy:
      matrix:
        node-version: [12, 14, 16]
      fail-fast: true
    steps:
      - name: Checkout code
        uses: actions/checkout@v2

      - name: Set up Node.js
        uses: actions/setup-node@v2
        with:
          node-version: ${{ matrix.node-version }}

      - name: Install dependencies
        run: npm install

      - name: Run Tests
        run: npm test
Without fail-fast, if one matrix job fails, all other matrix jobs would continue running, even though the outcome of the job is already determined (since one of the jobs failed). This leads to wasted time and compute resources.
This is particularly effective when it comes to caching dependencies, like npm packages. Here’s an example
jobs:
  build:
    runs-on: ubuntu-latest
    steps:
      - name: Checkout code
        uses: actions/checkout@v2

      - name: Cache npm dependencies
        uses: actions/cache@v2
        with:
          path: ~/.npm
          key: ${{ runner.os }}-node-modules-${{ hashFiles('**/package-lock.json') }}
          restore-keys: |
            ${{ runner.os }}-node-modules-

      - name: Install dependencies
        run: npm ci

      - name: Run tests
        run: npm test
The cache action stores your npm packages in this configuration based on the package-lock.json file. If a cache hit occurs (meaning the dependencies haven’t changed), the action will restore the packages from the cache instead of reinstalling them, which can significantly reduce build time.
If the files you're downloading from actions/cache are over 5GB, this step alone could take over a minute. One way to optimize it even further is using useblacksmith/cache, which is a drop-in replacement for the actions/cache which can speed up your cache downloads by 5x since the cache is colocated with the Blacksmith runner, but this also means it only works when used with a Blacksmith runner.
Docker builds can often be a bottleneck, both in terms of time and cost. Without any layer caching, Docker images must be built from scratch each time; they can take a while and incur significant costs. Here are some ways you can optimize Docker builds.
Jobs can occasionally get stuck and they’re only cancelled automatically on GitHub-hosted runners after six hours. You can set a timeout for a specific job or for an entire workflow. We typically recommend setting the timeout to approximately 3x the average duration of the job to allow enough buffer time while preventing endless hangs.
Setting timeouts for jobs:
To set a timeout for a specific job in your GitHub Actions workflow, you can use the timeout-minutes parameter. Here’s an example:
jobs:
  build:
    runs-on: blacksmith-4vcpu-ubuntu-2204
    timeout-minutes: 15  # Job will time out after 15 minutes
    steps:
      - name: Checkout code
        uses: actions/checkout@v2

      - name: Install dependencies
        run: npm install

      - name: Run tests
        run: npm test
In this example, if the build job exceeds 15 minutes, it will be automatically terminated.
Setting timeouts for workflows:
You can also set a timeout for an entire workflow, which is useful when you want to enforce a limit on the total time spent on all jobs within that workflow. Here’s how to do it:
name: CI Workflow
on: [push]
timeout-minutes: 30  # Workflow will time out after 60 minutes
jobs:
  build:
    runs-on: blacksmith-4vcpu-ubuntu-2204
    steps:
      - name: Checkout code
        uses: actions/checkout@v2

      - name: Install dependencies
        run: npm install

      - name: Run tests
        run: npm test
In this configuration, if the entire workflow takes longer than 30 minutes, it will be canceled.
Another way to control costs is by setting job dependencies. By configuring jobs so that subsequent jobs only run if previous ones succeed, you can prevent unnecessary executions that waste resources. This is particularly useful in complex workflows where multiple jobs depend on the outcome of earlier tasks.
Example of job dependencies:
name: CI Workflow
on: [push]
jobs:
  build:
    runs-on: blacksmith
    steps:
      - name: Checkout code
        uses: actions/checkout@v2

      - name: Install dependencies
        run: npm install

      - name: Run tests
        run: npm test

  deploy:
    runs-on: ubuntu-latest
    needs: build  # This job will only run if the build job succeeds
    steps:
      - name: Deploy application
        run: npm run deploy
In this example, the deploy job is dependent on the successful completion of the build job. If the build fails, the deploy job will not execute, saving resources and preventing unnecessary costs associated with failed deployments.
Choosing the right compute resources for your GitHub Actions jobs plays a big role in both performance and costs. GitHub offers a range of instance types for hosted runners, varying from 2 to 64 vCPUs. Here’s how to effectively select and manage resources to ensure cost efficiency without sacrificing performance.
workflow-telemetry action collects telemetry data on resource usage during job execution. This data can reveal whether you are underutilizing or overutilizing compute resources like CPU, memory and disk I/O.From this data, you can adjust your runner type — scaling up if you're consistently maxing out CPU usage or scaling down if resources are underutilized..png)
a. We’re half the cost per minute compared to GitHub runners.
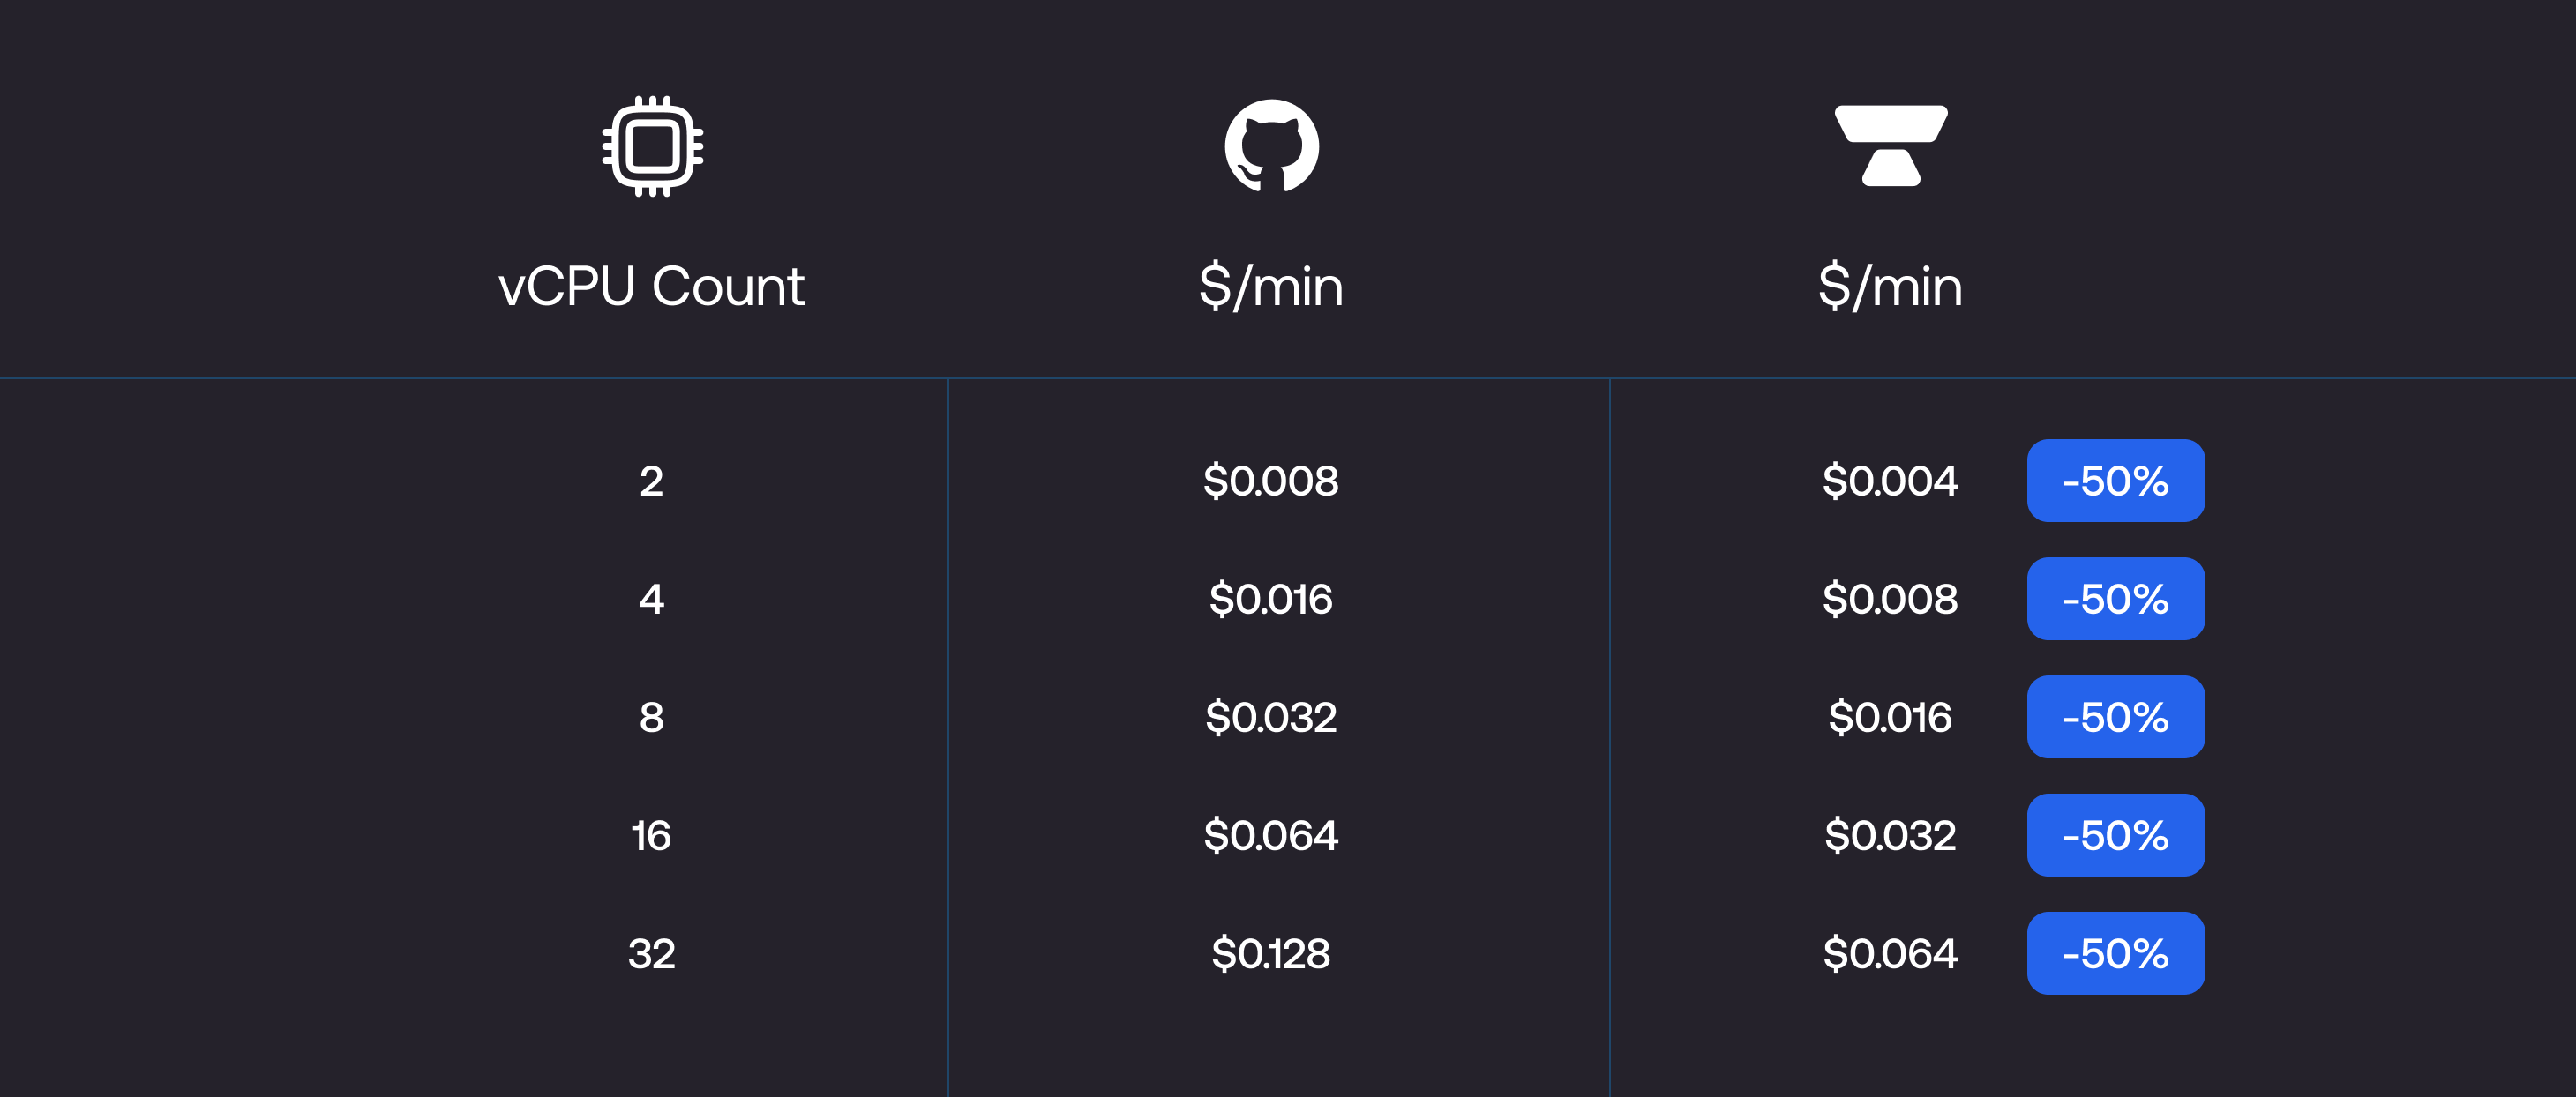
b. We run CI jobs on gaming CPUs with high single-core performance, ideal for workloads like code compilation, builds, and tests, which are common in CI. We’re 40-60% faster than GitHub runners for CPU-intensive workloads.
c. When you combine the fact that we’re half the cost per minute and that you would be using fewer minutes since Blacksmith runners are substantially faster, your overall CI bill is ~70% less than GitHub runners.
Migrating to Blacksmith for a job involves a one-line change replacing the runs-on tag with a blacksmith runner. We’ve also created a migration wizard to create a PR with all the changes you need in 3 clicks.

